


Order Today
There are five steps in ordering. Start here with …
STEP 1
Determining your system needs
smartBLIND is shipped on a system-by-system basis. Therefore, one order form is required for each system. See what a system includes.
Read the GUIDE (in the right-hand column) about grouping blinds to help you determine the number of blinds you want in a system. Also, check the application examples for additional information. In addition, you may want to consider the additional options available to you: the local command unit and the remote computer interface.
Once you have determined how many blind you want in the system, you will need to specify the size of the blinds.
GUIDE to determining how to best group the blinds within a single system
Typically, you will want one blind per window, and you can have as many as six blinds in a single system.
However, you may not want to group all the blinds in one room into a single system.
Windows facing different directions experience different daylight conditions. In automatic mode, all of the blinds within one system will respond to the signal from a single sunlight sensor. And so, for example, it may not make sense to group a north-facing blind with west-facing blinds, since they will experience very different daylight conditions over the course of the day.
OPTIONS: See the additional options available for smartBLIND.
STEP 2
Specifying blind size
smartBLINDs may be mounted inside a window frame (inside mount) or on the outside of a window frame (outside mount). Measure and specify the exact size of each blind in the system in the order form.
Read the GUIDE (in the right-hand column) and then measure for your blinds.
Once you have determined blind size, you will need to specify the colour of the blinds.
GUIDE to choosing blind size
1 Exact measurement of the blinds must be specified in the order form. Give measurements in either inches or centimetres.
2 For outside mounts, measure the desired width and height, allowing for the amount of overlap you desire.
3 For inside mounts, the window frame must be 2 inches (5.1 cm) deep to accommodate the blind headrail and the blind computer.
Note that our factory will deduct 1/4 inch (0.65 cm) from the blind width (1/8 inch or 0.32 cm per side) for inside mounts to ensure correct fit within the window frame.
STEP 3
Specifying blind colour
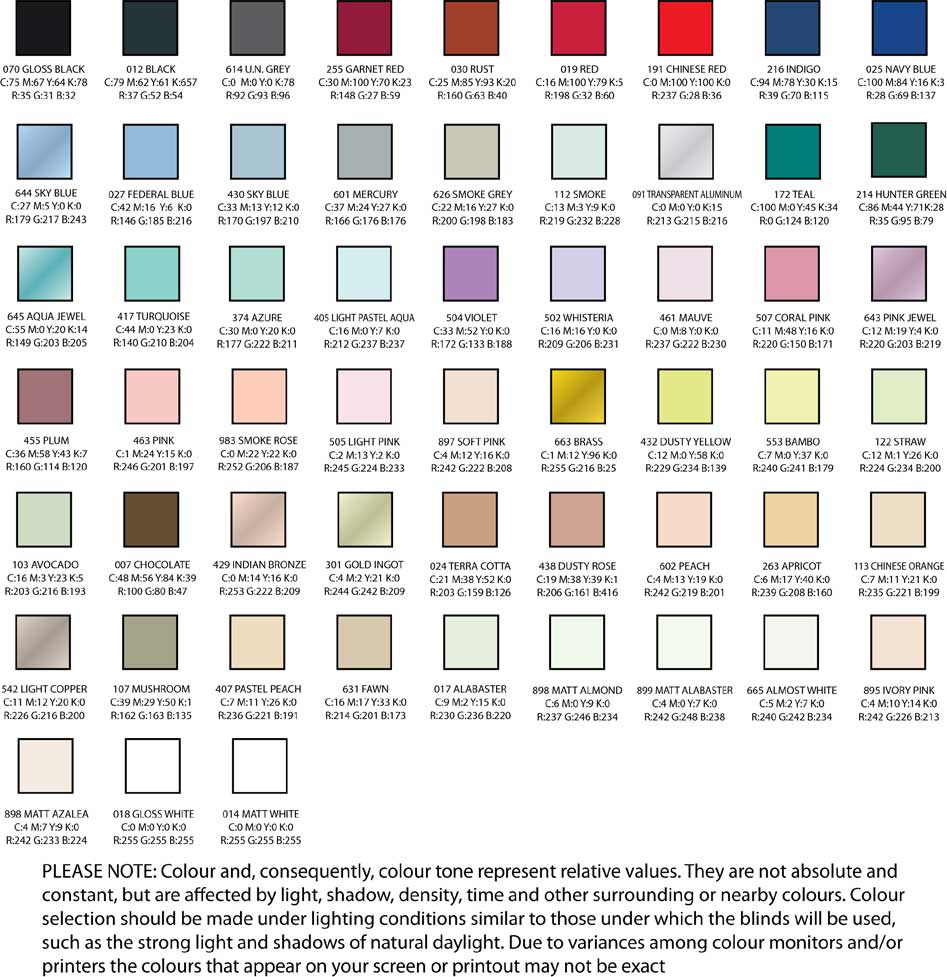
smartBLINDs come in a range of colours, which you can choose from the chart at right.
Read the GUIDE on blind colour (in the right-hand column) and refer to the colour chart to specify your blind colours.
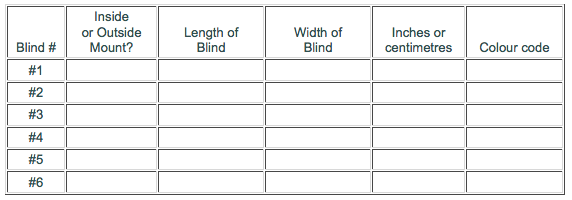
You should now have the details to fill in the information as in the table below.
GUIDE to choosing blind colour
Exact colour representation cannot be achieved with this colour chart due to discrepancies introduced by colour monitors, browsers, printers, etc. However, each colour has been assigned RGB and CMYK number codes, which are exact representations of the real-life colour. Contact us to receive a printout of the true colour palette if required.
STEP 4
Specifying cable lengths
The smartBLIND system requires you to specify lengths of 2 kinds of cable.
6 connector cable
The total length of “6 conductor” cable must be specified.
This is the length of cable required to connect
- the Command Unit to the RJ12 Adapter (L1) and
- the Power and Interface Unit to the Command Unit (L2)
The total length of “6 conductor” cable is LT = L1 + L2.
RJ12 cable
Each RJ12 cable that is required for your system must be also specified. There will be as many cables are there are blinds in the system.
- The first cable length specified (D1) is the length from the RJ12 Adapter to the first blind.
- The second cable length specified (D2) is the distance from the first blind to the second blind, and the process is repeated as such for each of the remaining blinds in the system.
Once you have specified cable lengths, you are ready to fill out and submit the order form.
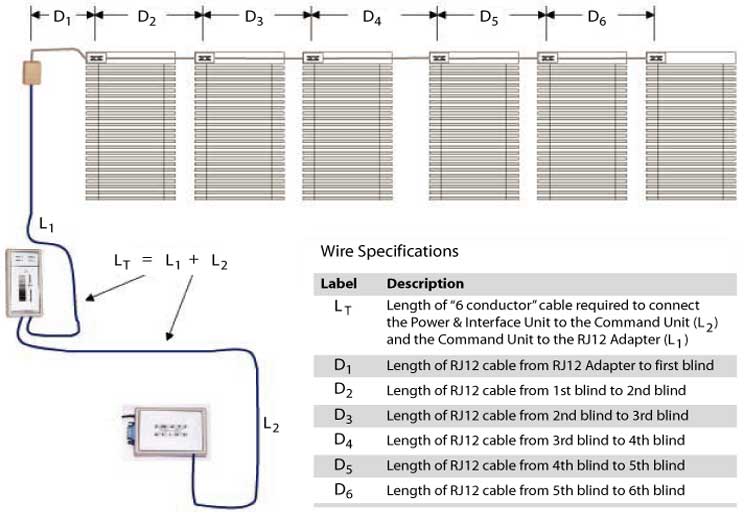
To get a better idea of how to specify the lengths of cable you need, see the illustration of how the “6 connector” cables and RJ12 cables integrate the smartBLIND’s system.
STEP 5:
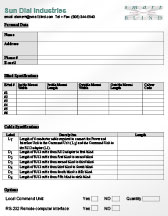
Filling out and submitting your order
You are now ready to fill out the order form and submit it.
There are three options for completing the order form:
- Fill out and submit the online order form. (under construction)
- Download the order form (order_form.txt). Open the order form with any text editor and fill out the required sections. Save the order form and then email it to us as an attachment.
- Download the order form (order_form.doc). Open the order form with Microsoft Word and key in the information required. Save the order form and then email it to us as an attachment.
Once we have received your order form, we will review it for correctness and then reply to your email with an exact price quotation, an invoice, and a PayPal account number to which payment can be made. Once we have received payment, your order will ship within 7 working days.