


System Setup
System Setup controls
 On the underside of the Command Unit’s face, you will find the System Setup controls.
Mode Select
 switches are on the left side of the System Setup controls.
Example: The left switch (NIGHT CLOSE Enable) is in the DOWN position (ON) and the right switch (SENSOR Enable) is in the UP position (OFF). This means that smartBLIND close fully at night and reopen in the morning, but it will NOT adjust throughout the day. See the Mode Select Table for more information.
Sensitivity Adjust
is on the right side of the System Setup controls. After making a sensitivity adjustment, allow 20 minutes before readjusting in order to properly assess the system response.
- Mode selection
- Sensitivity adjustment
Mode selection
The smartBLIND system has four modes of operation, which can be chosen by selecting the appropriate DIP switch position (see the illustration on the right). The DIP switches enable the sunlight sensor and the night close function. If the SENSOR Enable is ON, then the system will adjust the blinds according to changes in sunlight intensity. If the NIGHT CLOSE Enable is ON, then the system will close the blinds fully at night.
The illustration at the right shows one possible configuration for the DIP switches. To see how the four different DIP switch positions affect smartBLIND system performance, go to the Mode Select Table.
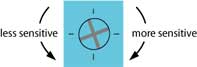
Sensitivity adjustment
The smartBLIND system can be customized by adjusting its sensitivity to sunlight. Using a jeweler’s screwdriver, turn the Sensitivity Adjust control.
Turning it clockwise will make smartBLIND more sensitive to sunlight, meaning your blinds will start to close in response to only weak daylight. Turning it counterclockwise will make smartBLIND less sensitive to sunlight, meaning your blinds will start to close in response to only strong daylight.
Other kinds of modification are made by using the Slider.